Are you wondering how you can use your headphones as a mic on a pc?
If you thought the headphone could only be used for listening purposes, you have not known its full potential.
Time and time again, we come across fascinating tricks and hacks that make our work very easy. We have one for you today!
Suppose you want to record something on your PC but you do not have a microphone. How do you do it? You can use your headphones itself as a mic.
Yes you heard it right.
That's exactly what we are going to discuss today.
How to use headphones as a mic for PC?
We are going to show you how to use an earphone as a microphone in your PC.
Whenever you connect an earphone to the PC, it will not directly start operating as a microphone.
Even if your earphone has an inbuilt mic for speaking on calls on your smartphone, it won't act as a microphone with the PC.
There are a number of configurational settings that need to be changed to transform your earphone into a microphone.
However, keep in mind that only the earplugs will act as a microphone for recording audio into your PC. It cannot be done through the mic that is attached to the earphone.
Connecting your headphones to your PC
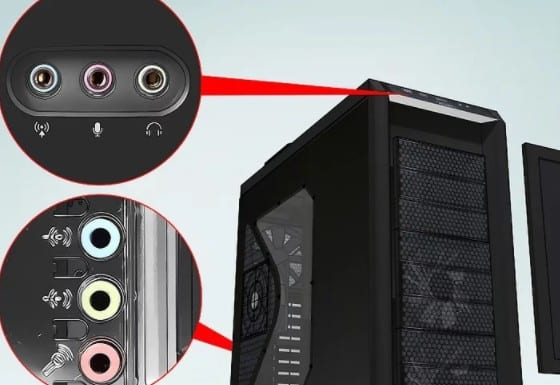
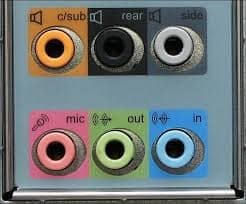
On the rear panel of the CPU, you will find three audio inputs. They are usually in three colors – pink, green and blue.
The pink one is used for connecting a mic. The green is for headphones. Likewise, the blue is line-in.
You need to insert the connector of the earphone or headphone(the one you want to use as a microphone) into the pink input.
Configure your headphones
Once you are done inserting the earphone, you have to make some setting changes on your PC. We will be talking about that now.
First of all, take your mouse cursor to the volume icon on the bottom right corner of your desktop. Right-click on that icon and go to 'Sound'.
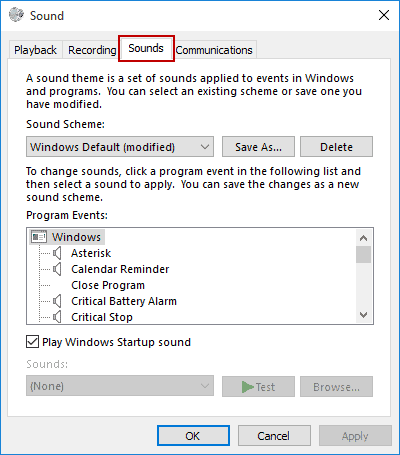
A 'Sound' dialogue box will open on your screen. It has four tabs – Playback, Recording, Sounds, and Communications.
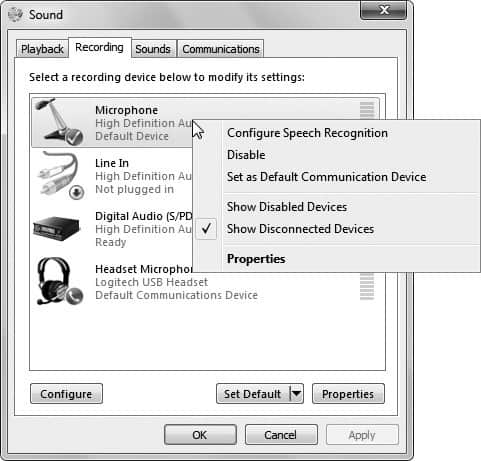
You have to click on the 'Recording' tab. Following that, on the 'Microphone' option, click the right mouse button. You will see a menu that has 'Configure Speech Recognition'. Click on that.
The 'Speech Recognition' page will open on your screen. Click on 'Set up a microphone'. It will open the 'Microphone Setup Wizard' dialogue box.
Select the 'Headset Microphone' option by left-clicking on it and then press 'Next'.
There will be a series of information in the following steps that you need to read and click on 'Next'. Keep doing that until you see 'Your microphone is now set up' on the screen. Click on 'Next' one last time.
How to adjust the headphone for loudness
After that, again right-click on the 'Microphone' option and go to 'Properties'.
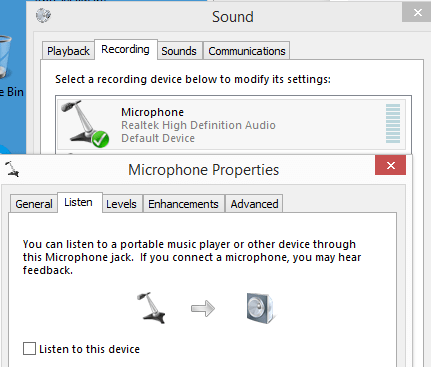
In the 'Microphone Properties' dialogue box, go to the 'Listen' tab. Tick the 'Listen to this device' option, if it is not ticked.
Next, go to the 'Levels' tab. You can change the 'Microphone' volume and 'Microphone Boost' here. To start with, keep the 'Microphone' volume at 100 and 'Microphone Boost' at '+20dB'.
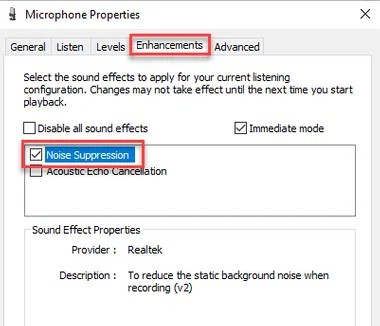
Then, go to the 'Enhancements' tab. There, you need to tick the following three options:
- Disable all sound effects
- Beam Forming
- Acoustic Echo Cancellation
Do not tick the 'Noise Suppression' option.
Finally, go to the 'Listen' tab and click on OK. You might be able to see the levels going up and down on the Microphone option as you speak.
Close the 'Sound' dialogue box. You are good to go!
How to use Apple headphones as microphones for PC
Before we start the discussion, you should know that Apple designs its hardware primarily for Macbooks. Hence, there is a high possibility that a majority of them won't work on your PC.
However, luckily some of the Apple hardware is supported by the Windows PC.
In case you have a pair of Apple headphones lying around in your house. You want to use them as a microphone on your PC. The following steps can be really helpful in doing so.
Connect your Apple headphones to your PC
The process of connecting the headphones to your PC is fairly similar as above.
On the rear panel of the CPU, insert the connector of your Apple headphones into the pink input. The pink input is meant for microphones.
This is the only confusion you need to get clarified. The common mistake made by many is that they connect the headphones into the headphone input (green one).
So once you manage to skip over this hurdle, you are good to proceed on to the configuration process.
Configure your Apple headphone
First things first, all the configure will take place in the Control Panel. In case you do not know how to find the Control Panel, it is very simple.
Go to the Search bar by pressing the Window key on your keypad. Just type Control Panel. Once the icon appears in the search results, just click on it.
There is an alternative method as well. Press Control+R on your keyboard. The Run dialogue box will appear on the screen. Type Control Panel and press Enter. The Control Panel will open on the screen.
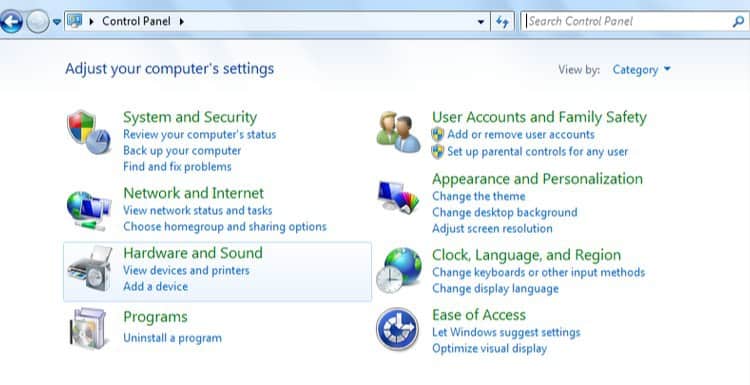
Once it opens, locate an option called 'Hardware and Sound' and click on it.
Following that, try to find 'Manage Audio Devices'. You should get it in correspondence to the Sound option.
Once you click on it, a dialogue box will appear that has the settings for the sound devices.

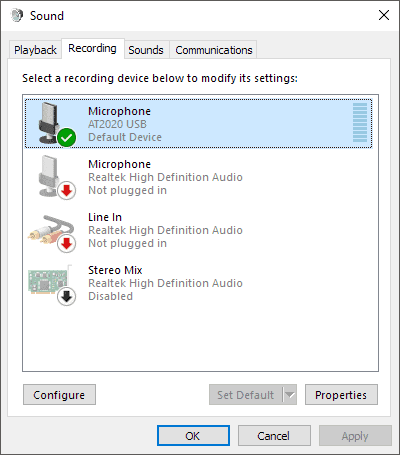
Under the 'Recording' tab, you should be able to see your Apple headphone named as Microphone. Ideally, it will be displayed as a High Definition Audio Device.
You need to enable it by clicking on the set as default.
Keep in mind that the success of this process will be entirely dependent on the configuration of your PC.
How to adjust the loudness of your Apple headphone?
Setting the loudness levels for your Apple headphone is not different from what we saw earlier. You need to follow a similar procedure.
Just to brush things up for you, let us lay it out once again.
Once you reach the Recording tab by following the above-mentioned steps, select the Apple headphone that is marked as a microphone.
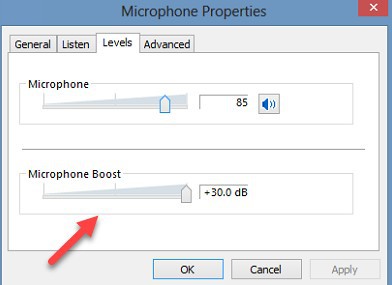
Go to the 'Levels' tab where you will find the Microphone volume and Microphone boost. By default, they are set at 100 and +20dB respectively.
You can choose to notch up the boost to +30dB for added loudness. However, it is normally advisable to keep it at +20dB to avoid any distortion.
Read Also: How to Earrape Mic? (Discord, Zoom) – Don't Miss this Guide
Conclusion
Next time you are in a hurry to record something on your PC and you do not have access to a microphone, this trick should come really handy.
If you have two pairs of headphones, you can use one for listening and the other one as a mic. The quality may be a compromising factor, but something is better than nothing, right?
At least you won't be mute during the entire multiplayer gaming sessions!
Read Also: How to Fix Bluetooth Lag in Car? – 8 Super Quick Solutions