Where is the Microphone On the MacBook Pro? Many new buyers have this query. If you are also one of those, you are reading the right blog post. Mics in MacBooks play a big role as most people use them during FaceTime or recordings.
So, how can you get the best out of them and where are they located? Let's find out!
Read also: Where Is the Microphone on the MacBook Air? 4 Series Guide
Where Is the Microphone on the Macbook Pro Located? Quick Answer
Most Apple MacBooks usually have up to 3 mics for the best voice pickup and clarity.
- They are present in optimal places so that there is no trouble when you're recording or on a call.
- If you're considering the MacBook Pro then you can find the internal microphone in the upper right of the keyboard and speakers.
However, the mic placement could be changed based on the model of your MacBook. Continue reading to learn about the position of the mic in older and newer models. Also, get insights into optimizing and testing your microphone. Let's dive deeper into this informative guide!
MacBook Pro Microphone Location by Year of Manufacturing
The location of the Mac's microphone varies with the model and year of manufacturing. Let's explore more into this:
Newer Models
If you're using a newer 2018 or later MacBook Pro, they have 3 mics for audio recording and calls. Here is where to find the location of the mic:
- The mics are generally present on the right side of the keyboard and speakers.
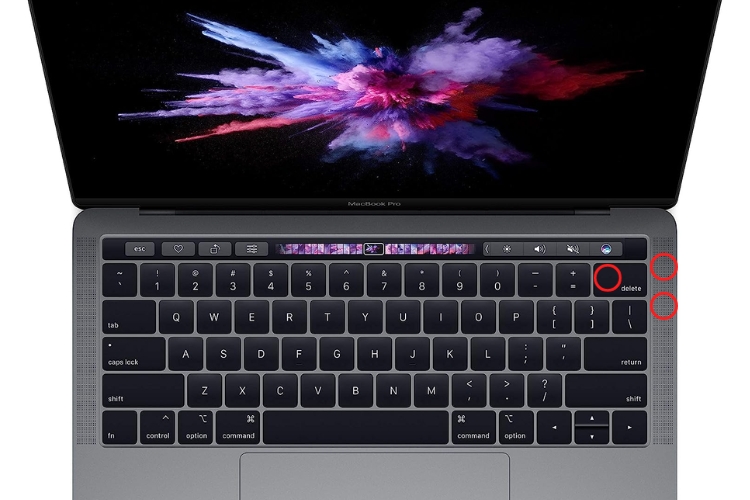
- On the 15-inch models, you can also find the built-in microphone under the right speaker casing.
Older Models
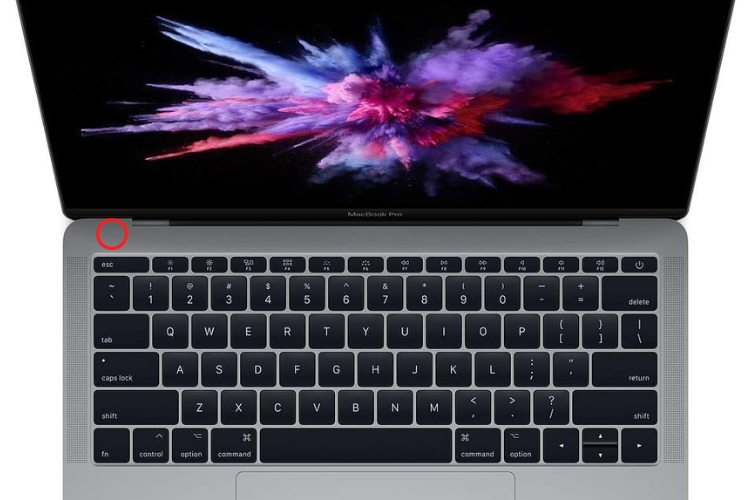
On the other hand, if you are still using a MacBook, like the 2017 or older model, then it is typically located near the bottom left side, just above the ESC key.
If you are not successful in finding the built-in microphone, then you can find help from the Apple threads about your specific model.
Does the Built-In Microphone on the Macbook Have Any Benefits?
The built-in microphone on Macs is really useful. Let's go through the various reasons:
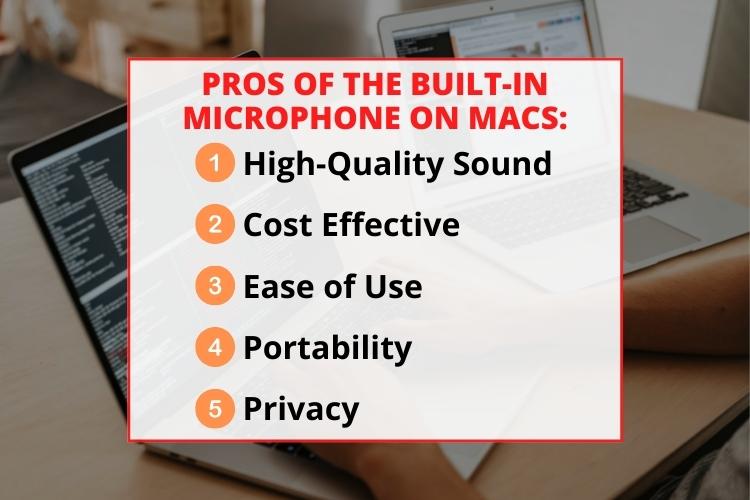
- High-Quality Sound: The built-in microphone on the MacBook Pro has superb software optimization. The most advanced processing of the audio recording leads to really high-quality sound.
- Cost Effective: If you're using a mic on the MacBook Air then it is also cost effective as well. The mic quality is good enough that you don't need to spend extra money. So, it saves you a lot of money while providing good audio with lower background noise.
- Ease of Use: The MacBook Pro microphone is easier to use and configure. It doesn't require an expert to get it going. Just head to the microphone settings, enable it and you're good to go.
- Portability: As the Mac's microphone is an internal one, it is always with you. Portability is a key factor in using a MacBook. The mic quality is good enough and it is always with you, so you can record at any time.
- Privacy: Another big plus for the built-in microphone is that it is always safe. It is because of its integration with the MacOS that it can't be accessed from anywhere if you haven't given it permission.
These 5 reasons make the internal microphone of the MacBook worthwhile as it provides good sound quality, and background noise reduction while not breaking the bank.
Checking the Microphone Settings in the MacBook Pro
There are a lot of times when people accidentally deny the microphone permissions in an app. It is generally when you've installed a new app. There is an issue that you need to fix immediately as it can be troublesome if you have to do a meeting.
Let's see how you can check the microphone settings and fix these problems!
Giving Permission To Apps For Using Microphone Explained
Anytime you visit a website or an app that has to use the Mac's microphone, it asks for your permission to allow it. If you somehow misclick and deny access, you can fix it easily. I'll guide you through the process.
Finding the Microphone Settings
Before you can give the permission, you have to get to the microphone settings. Here is how:
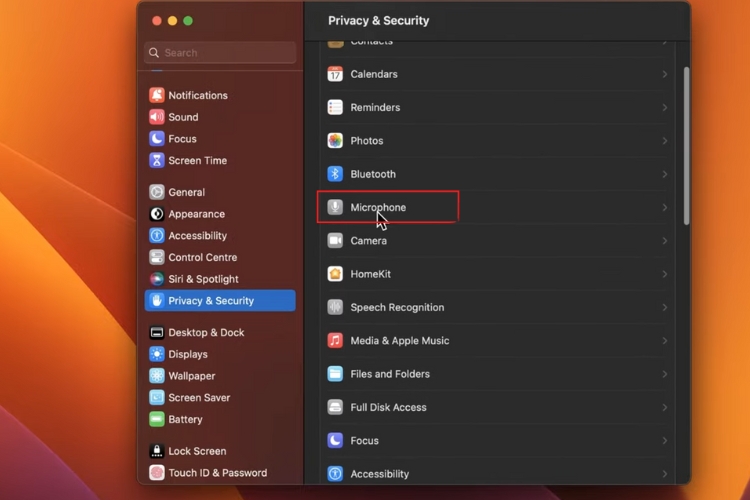
- There is an Apple menu on the top right corner of the MacOS. Go there and click on System Preferences.
- Go to Security and Privacy. You need to click on the Privacy option present there.
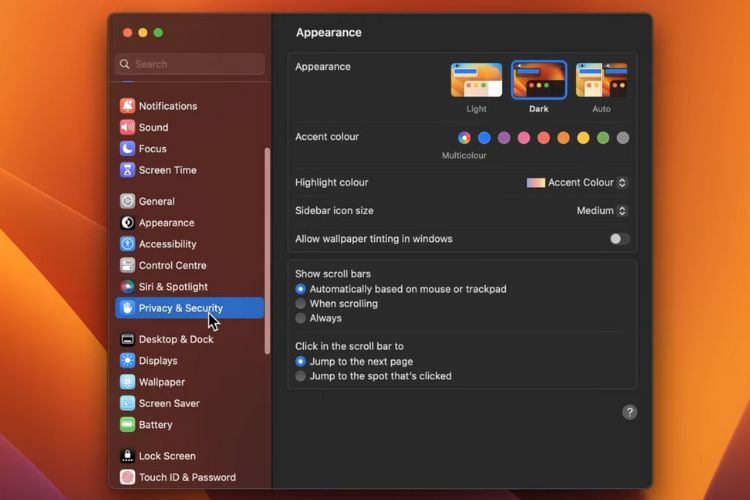
- There is a section labeled Microphone, click there.
Enabling the Mac's Microphone
After you've found the settings, follow these steps:
- All of the applications that you've given the mic access to are present in the mic settings.
- Right next to each of the apps, there is a check box.
- If you want to give or remove mic access from an app, simply check or uncheck the box.
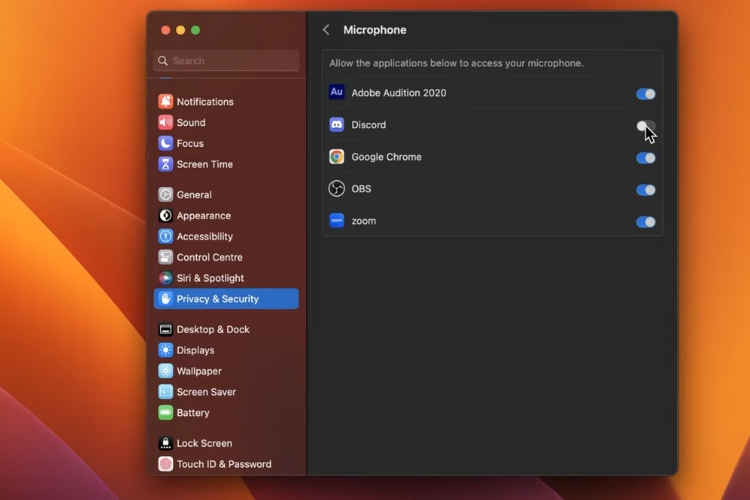
- Put in your password and confirm the settings.
MacOS is pretty smart and in a lot of cases, if the app works using a mic, it will automatically ask you for permission again. This always works for apps with audio/video calls.
Testing The MacBook's Microphone
If you want to test your Mac's microphone, then follow these 5 simple steps:
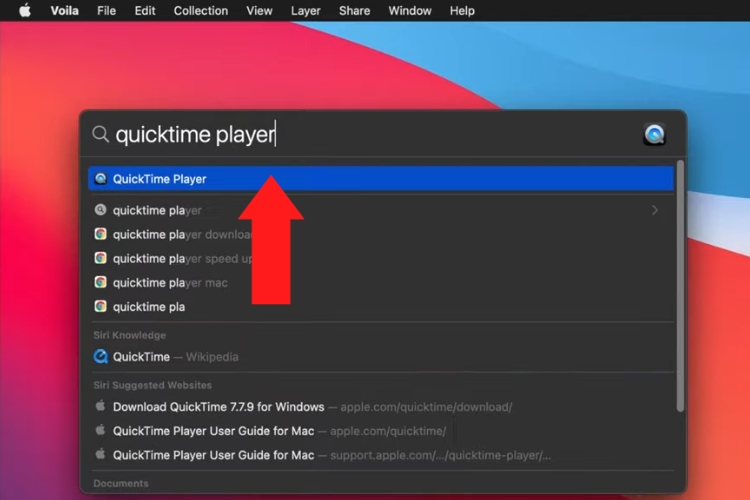
1. Run QuickTime Player
The first step is to open the QuickTime player. It is present in the launchpad in the apps folder. Once you got it up and running, head to the file and select the new audio recording. A window will open where you can start a fresh recording on your MacBook Air.
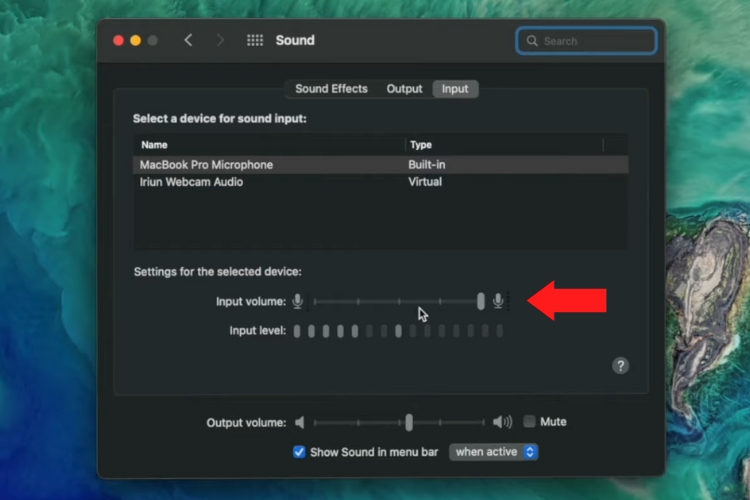
2. Increase the Input Volume
Now, you have to crank up the input volume to the max, so that the mics pick up everything. You can easily do this by sliding the mic slider to the highest level in the menu bar.
3. Start the Recording
Once you've done all of this, press the record button. As it is recording, speak for a few seconds. Also, remember to speak clearly and loudly so that the microphone can catch your words well.
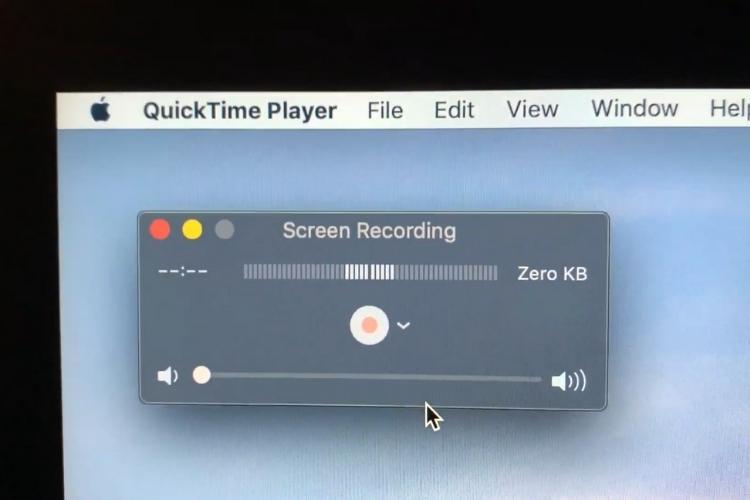
4. Listen to it
After speaking for a bit, stop the recording and analyze it. If you are able to hear yourself without any background noise, then the mics are working perfectly fine.
5. Troubleshoot Problems
If you are not able to hear yourself properly and there is some weird noise present, then the mics are definitely not working properly. There must be some technical problem present. You should contact Apple support to fix this issue.
How to Fine-Tune the MacBook's Mic?
Historically, the mics on the MacBook have been solid without you needing to use an external mic. But, there are some instances where the mic might not be functioning properly. You can fine-tune the mic on your MacBook to provide even better mic quality. Let's learn how to do it:
1. Adjusting Volume Settings
From the System Settings, go to the Sound menu and increase the mic's loudness. If you increase it, the mic picks up more sound and vice versa.
Checking the Ambient Noise Reduction also helps in reducing background noise. You need to turn it on as well.
2. Removing Obstructions
If you're using a 2020 or prior MacBook, then the mic might not function properly if some other object is present close to it. If you are using a casing, then remove it to allow the mics to pick up sound properly. It is because the mics on these MacBooks are present in between the keyboard and the display.
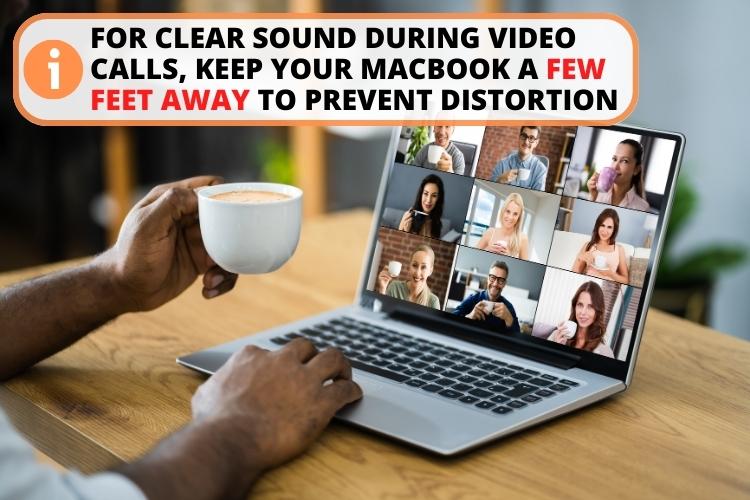
3. MacBook Placement
If the MacBook is closer to you then the mic will sound louder and richer. But moving the laptop too close to you might distort the sound.
Therefore, it is best to keep it a few feet away. The distance should be optimal for video calling and the mic should pick up your voice clearly.
4. In-App Settings
There are some apps that allow you to change the mic settings in the app itself. iTunes is a popular example of such a type of app where you can change the settings.
Mic Not Working: What Should You Do?
There are a lot of reasons why a mic might stop working on a MacBook. Sometimes there are faulty settings or a third-party app that is interfering with the app. Let's explore them below:
1. Restart the MacBook
This is the first step that you should take if you face a mic problem but for some reason, people don't like restarting their MacBooks. There might be a lot of unsaved work that you don't wanna lose. For restarting:
- Click on the Apple logo on the top right;
- Press Restart;

- Once it turns back on, check whether the mic is fixed or not.
2. Check Input Settings
A lot of the time, people have set the input volume to very low. That is why the mic struggles to pick up any sound at all. The first thing that you should do is to configure the settings and here is how:
- Open System Settings as described earlier.
- Click on Sound.
- Go to Input and then Built-In.
- Check whether the input volume is at max or not.
- Speak into the laptop to check the bars.
- If the volume is low and the bar is not filling up, set the volume to the max.
3. Microphone Permissions
A lot of applications on the MacBook require microphone permissions like Skye and Zoom. These apps use the mic for audio and video calls. If somehow the mic stopped working in these apps, then the permissions might've been revoked somehow. But don't worry as you can easily fix this.
- Go to System Preferences.
- Click on Privacy and then to the Microphone.
- You will see the apps listed there.
- Check the apps to which you want to give microphone access.
- The mic should start working again.
4. Check For Malware
Malware is another reason why your mic is not working normally. It can cause issues with the microphone, so it is best to run a scan. The best way is to use a cleaner app on your MacBook.
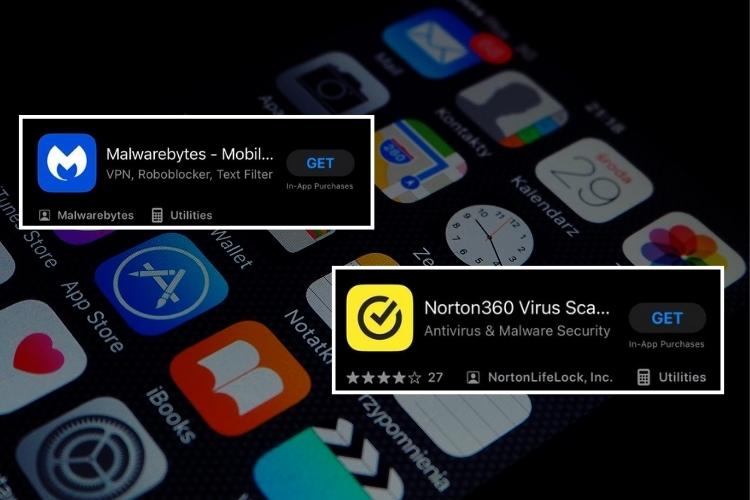
There are different apps present on the AppStore like Malwarebytes or Norton 360. Run a quick scan and see if anything pops up. It might be the reason for the faulty mic.
5. Turn on Dictation
If the mic is not working, another fix that you can try is to switch on Dictation. It is a quick fix if the mic is not responding. You need to follow these steps:
- Click on System Settings and go to Keyboard.
- Check for Dictation and turn it on.
There might be drivers on the Mac that you currently don't have. Enabling this option will download the required drivers automatically and thus, the mic should start working again.
6. Reset the NVRAM/PRAM
One last thing that you can do is to fix the mic by resetting the Parameter RAM. The PRAM stores all of the different Mac settings in it. So, if you reset it, there is a likely chance that it fixes the mic problem. To reset it, follow these steps:
- Go to the Apple logo and Shut Down;
- Wait till the Mac turns itself off;
- Press the Power button and the following keys (cmd + alt + P + R) at the same time.
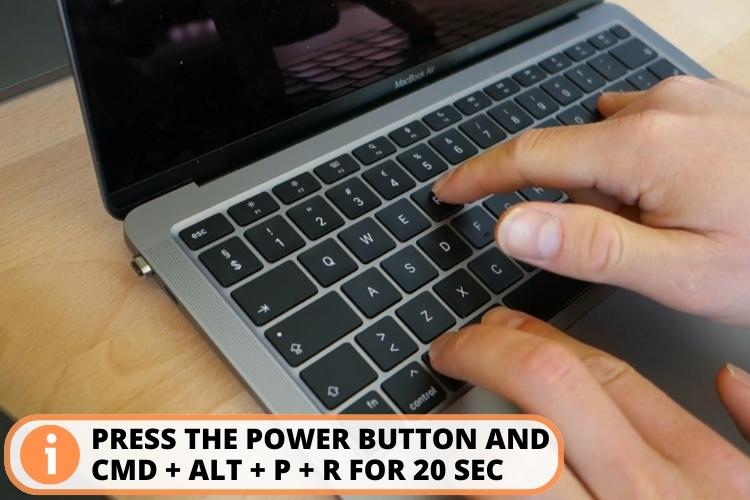
- Hold these down for about 20 seconds.
- Release them and the MacBook should start with PRAM reset.
Keep in mind that this fix works only for Intel-based MacBooks. If you are using an Apple Silicon Mac, you don't need to reset the PRAM.
FAQs
You can easily test the microphone on your MacBook Pro by going to QuickTime player. Start a recording, speak into the mic, and then play it back. This will give you a good idea of how the mic sounds. Then you can make further adjustments accordingly.
There is no dedicated microphone button on the MacBook Pro. There is an internal microphone present in it and you can access it through the settings.
There could be any number of problems due to which the MacBook microphone doesn't work like issues with app permission or incorrect input settings. If there are no software issues, then it is possible that your mic is faulty. To confirm, check with an external USB microphone.
The microphone on the MacBook Pro 2014 is present on the left side near the MagSafe connector close to the 3.5 mm port.
Conclusion
Summing up, the microphone on Macbook Pro depends on the specific model. On the 2018 and future models, the mics are present on the right side of the speakers and the keyboard. The 15-inch model also has some under the casing as well. The older models have mics present on the left bottom side.
These microphones are really good but you can also finetune them further. You can increase the input volume, go through the in-app settings, and remove any casing to make it better.
Mics can also stop working sometimes, in such a case, use the normal restart method. You can also try checking for malware, turning on dictation, and giving the apps proper permissions.
Read also: